
While there are many great benefits to mining Burstcoin, it does share the drawback of other cryptocurrencies like Bitcoin in that you need to leave your machine on, whether it’s your ASIC, GPU rig (which may be obsolete) or just the old PC you had lying around that you decided to mine BURST with. In my case, my 9-5 job is at home doing web development, so my work laptop is on during those hours anyway and it makes sense that I can just plug in a couple of external drives while I work and let the miner do it’s thing. The only negative I’ve found so far in doing this is that the USB 3 port that’s hooked up to my externals interferes a little with my Logitech Unifying Receiver. That’s easily rectified by moving the receiver to a port on the other side of the laptop.. no big deal!
But what if I want to mine BURST the other 16 hours in the day? Seems like an awful waste to not mine up to my full potential, right? The problem is, I don’t want to leave my laptop on 24/7. That seems like a waste of electricity and it would likely reduce the lifespan of my $1,500 laptop as well. On top of that, isn’t this the green cryptocurrency??
Enter the single board computer. The Raspberry Pi 3 is probably the most widely known and adopted in this category but it only sports USB 2.0, which is a shame because it’s just $45 on Amazon
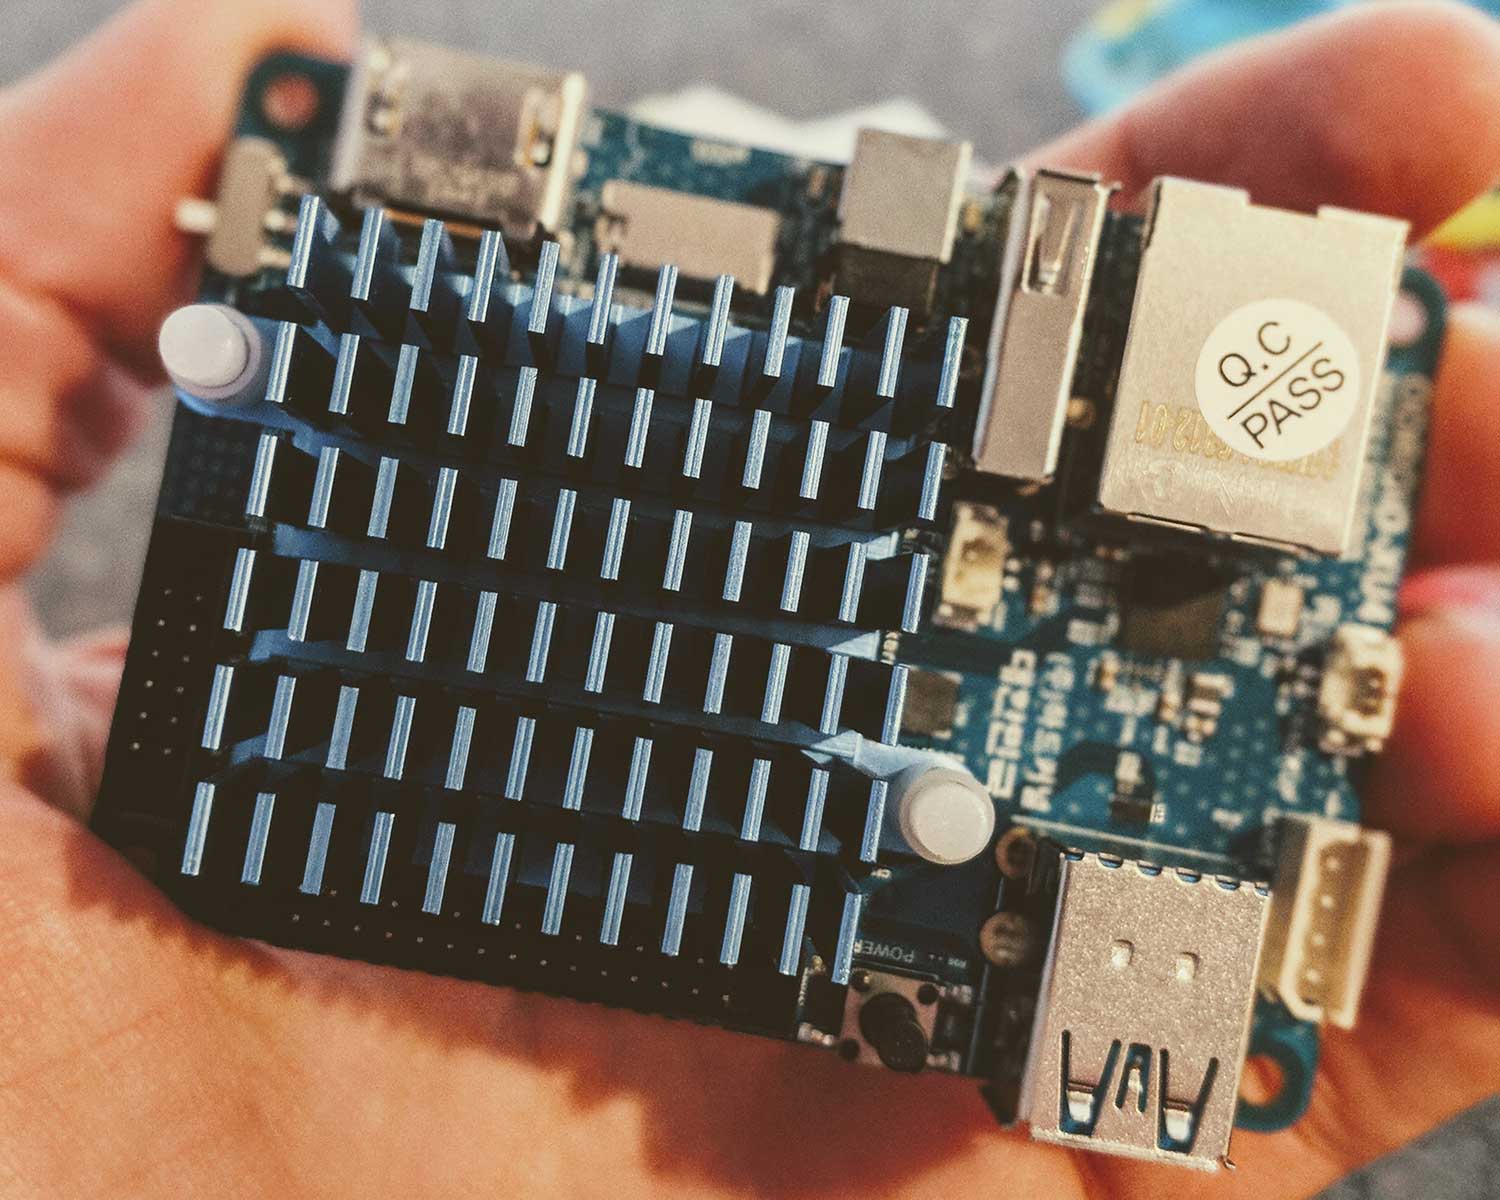
Looking around a bit on the interwebs, the best option I could find was the ODROID-UX4! The ODROID sports 8 cores, 2GB LPDDR3 RAM, two USB 3 ports, one USB 2 port and a Gigabit ethernet port. I feel like they made this thing for mining Burstcoin! I was able to find it on my favorite spot (Amazon
Man was I excited when this thing showed up in the mail.
I’m going to go step-by-step on how I set this up to start mining Burstcoin.
First, I unplugged my ethernet cable from the laptop and plugged it in the the ODROID’s ethernet port, then my second monitor (which has an HDMI hookup) and I plugged in a Logitech Unifying receiver for mouse and keyboard. At this point I’m not plugging in the hard drives, I just wanted to get it up and running. I also attached the eMMC module on the bottom of the board. I plugged in the power cord next and a little red light popped up on the back to let me know it was working.
I didn’t immediately know where the power button was, but the instructions were pretty clear. It’s the little black button next to the USB 3 ports. Turning it on, the screen lit up with what you’d expect a boot screen to look like, running down the list until the ubuntu MATE login screen comes up. Username and password are both “odroid”. Simple.
And then the thing turned off on me? Ha. What’s that about? I went back to the instructions to see what I’d done wrong, but it states that it’ll turn off automatically the first time for system configuration. Whew!
Turning it back on, all was well. I logged in and was greeted with the ubuntu MATE screen and the odroid’s Home folder on the desktop.
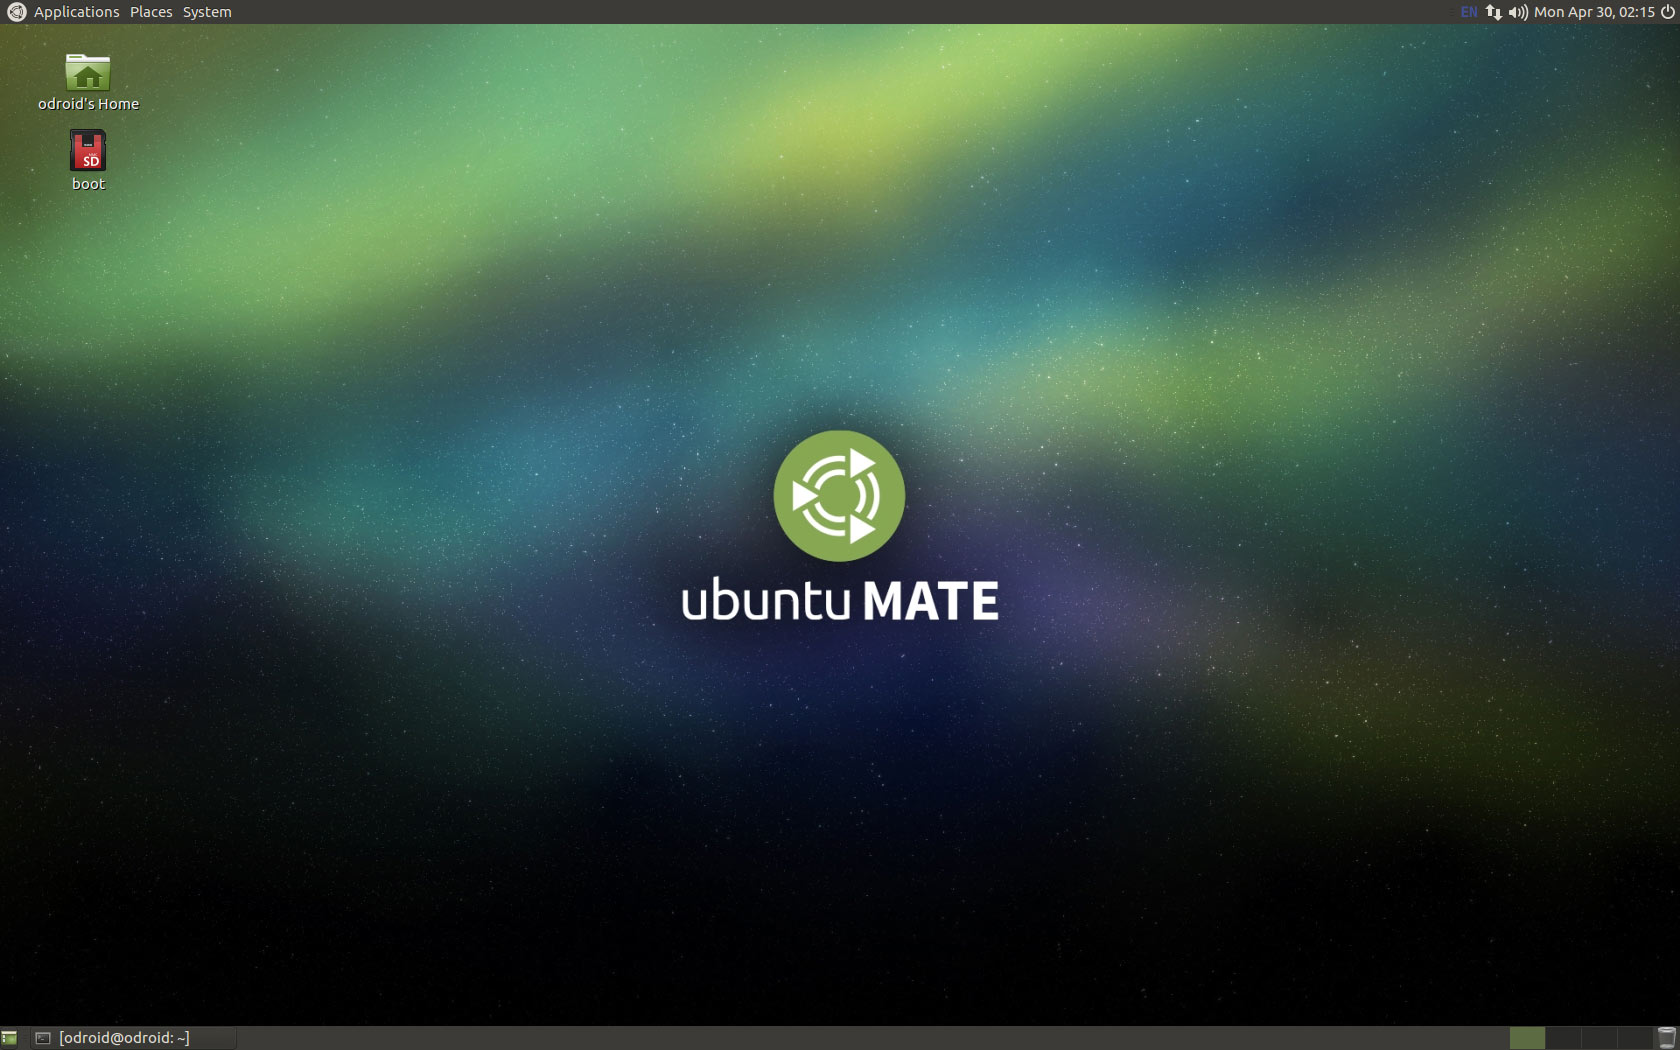
Having a little experience with Linux, I knew I was looking for the terminal first thing. On ubuntu MATE it’s under Applications → System Tools → MATE Terminal.
From there, follow the steps laid out by the instructions that come with the ODROID-XU4. Each step will install a set of packages for the system, so be patient while they install. If there are issues like locked folders, Google is your best friend.
sudo apt update
sudo apt upgrade
sudo apt dist-upgrade
sudo apt install linux-image-xu3
sudo reboot
Once this finishes, you should be all up to date with the operating system. Now time to install a miner! I was eager to get up and running with some sort of mining software, so the miner I chose to use was creepMiner due to it’s Linux availability. One thing I did NOT count on is that the latest release is for 64-bit Linux! The ODROID-XU4 is a 32-bit system.
Oh boy. This just got a little more complicated.
Compiling and Installing Creepminer from Source Code
Luckily since this is an open source project on Github, it’s available to grab and compile on your own, and they’re nice enough to give directions! https://github.com/Creepsky/creepMiner/wiki/Compiling-from-source.
The installation steps listed at the address above are great, but they’re incomplete for starting out on a bare system that was just booted up for the first time 5 minutes ago. I also used some newer versions of software packages than I think they intended. Here’s the procedure I followed in order to get this working.
Step 1: Install CMake
CMake is an open-source, cross-platform family of tools designed to build, test and package software. CMake is used to control the software compilation process using simple platform and compiler independent configuration files, and generate native makefiles and workspaces that can be used in the compiler environment of your choice.
sudo apt-get install cmake
Step 2: Install Git
Git will allow you to clone (download) github.com projects like creepMiner to install.
sudo apt-get install git
Step 3: Install Python 3
python3 -V
This will give you the version of Python 3 that you’re using. Mine is showing Python 3.5.2. If you don’t see that, you may have to install it.
sudo apt-get update
sudo apt-get install python3.5
Step 4: Install pip for Python 3
pip is a package manager for python. It will make sure that all dependencies are taken care of when using programs written in Python.
sudo apt-get install -y python3-pip
Step 5: Install conan
pip3 install conan
Step 6: Finally compile creepMiner
Now that all of the software installs are taken care of, it’s time to compile creepMiner from the latest source code.
git clone https://github.com/Creepsky/creepMiner
cd creepMiner
conan install . --build=missing -s compiler.libcxx=libstdc++11
cmake CMakeLists.txt -DCMAKE_BUILD_TYPE=RELEASE -DMINIMAL_BUILD=ON
make -j$(nproc)
This will run through the compilation process, hopefully without errors. Notice I’m using the -DMINIMAL_BUILD=ON option. I haven’t been back to test this more, but this is the only way I could get it to compile without giving me errors.
If all goes well, you should now have a new bin folder with creepMiner in it. In order to use this from anywhere in the terminal, you’ll have to add it to your PATH. I did this by going back to the home folder for odroid (in the GUI) and selecting View → Show Hidden Files. This will display all the hidden files in this directory. Locate the .bashrc file and open it with the text editor.
At the bottom of the .bashrc file, add the following and save the file.
# PATH
export PATH=$HOME/creepMiner/bin:$PATH;
This will allow you to start up creepMiner without having to navigate to it. Now to have that change take effect, type the following in the terminal.
source ~/.bashrc
Step 7: Configuration
We’re almost there! Now all you need to do is set up the configuration file for creepMiner. In the odroid folder, create a file named mining.conf. See the creepMiner documentation on what the values should be here.
This is my configuration file:
{
    "logging" : {
        "config" : "information",
        "general" : "information",
        "logfile" : false,
        "miner" : "information",
        "nonceSubmitter" : "information",
        "output" : {
            "dirDone" : true,
            "lastWinner" : true,
            "nonceConfirmed" : true,
            "nonceFound" : true,
            "nonceFoundTooHigh" : false,
            "nonceSent" : true,
            "plotDone" : true
        },
        "outputType" : "terminal",
        "path" : "/home/odroid/.creepMiner/1.7.16/logs/",
        "plotReader" : "information",
        "plotVerifier" : "information",
        "progressBar" : {
            "fancy" : true,
            "steady" : true
        },
        "server" : "fatal",
        "session" : "error",
        "socket" : "off",
        "useColors" : true,
        "wallet" : "fatal"
    },
    "mining" : {
        "benchmark" : {
            "active" : false,
            "interval" : 60
        },
        "bufferChunkCount" : 32,
        "cpuInstructionSet" : "AUTO",
        "getMiningInfoInterval" : 3,
        "gpuDevice" : 0,
        "gpuPlatform" : 0,
        "intensity" : 5,
        "maxBufferSizeMB" : 1500,
        "maxPlotReaders" : 0,
        "passphrase" : {
            "algorithm" : "aes-256-cbc",
            "decrypted" : "",
            "deleteKey" : true,
            "encrypted" : "",
            "iterations" : 1000,
            "key" : "",
            "salt" : ""
        },
        "plots" : [
            {
                "path" : [
                    "/media/odroid/HD1Name/Plots",
                    "/media/odroid/HD2Name/Plots"
                ],
                "type" : "sequential"
            }
        ],
        "processorType" : "CPU",
        "rescanEveryBlock" : false,
        "submissionMaxRetry" : 10,
        "targetDeadline" : 16873868,
        "timeout" : 45,
        "urls" : {
            "miningInfo" : "https://0-100-pool.burst.cryptoguru.org",
            "submission" : "https://0-100-pool.burst.cryptoguru.org",
            "wallet" : ""
        },
        "useInsecurePlotfiles" : false,
        "wakeUpTime" : 0,
        "walletRequestRetryWaitTime" : 3,
        "walletRequestTries" : 3
    },
    "webserver" : {
        "activeConnections" : 32,
        "calculateEveryDeadline" : false,
        "connectionQueue" : 64,
        "credentials" : {
            "pass" : "enterapasswordhere",
            "user" : "enterausernamehere"
        },
        "cumulatePlotsizes" : true,
        "forwardMinerNames" : true,
        "forwardUrls" : [

        ],
        "start" : false,
        "url" : "http://127.0.0.1:8080"
    }
}
The important parts to note here are:
- “maxBufferSizeMB” : 1500 – Your ODROID will have about 1700MB available, so set this a little lower or creepMiner will continue to crash on you.
- I would suggest naming your hard drives as one word. ubuntu MATE gives you a warning about renaming the drives and how you should back them up first before possibly losing all of your data when doing this… so I unplugged and did it on Windows 10 instead. The danger of losing your files is probably the same, but Windows doesn’t alert you about it. Ignorance is bliss. Anyway, it worked fine for me on Windows.
- sequential plots – Without this set to sequential, it’ll take another ~20 or so seconds to read the drives. I would assume this is because there’s not enough memory to read them in parallel.
- Make sure to remove the quotes around the targetDeadline value if you’re using a number instead of the 1y 1m 1d 1:1:1 format.
That’s it. To start it, open your terminal again and type the following:
creepMiner
At this point, the webserver portion isn’t working for me, but this may be due to compiling with minimal options.. or it could be that I need to configure the ODROID a little differently. If I have time to look into it, I’ll post my findings.
So there it is! My ODROID-XU4 Burstcoin Mining Rig has been mining away for days now on two 8TB drives and it’s working pretty well!
I hope you enjoyed this write up!
Update: For faster read speeds, check out Scavenger.
> Scavenger 1.6.0 vs. creepMiner 1.7.18 – 32 Bit Showdown
> Compiling Scavenger From Source to add OpenCL Support
> GitHub PoC-Consortium/scavenger

Do creepMiner minimal build include OpenCL support? It seems Odroid-xu4 supports “OpenCL 1.2 Full Profile”: https://www.hardkernel.com/main/products/prdt_info.php
Hi Anton! Not with the minimal option, but it does support OpenCL. It would just need to be compiled for it. You can see the compile options here: https://github.com/Creepsky/creepMiner/wiki/x_dev-Compiling
I’ll give an OpenCL build a try and see if it improves. Ideally I would like to get as many external drives on the rig as possible.
Do you know if you can attach a USB 3.0 hub to connect more than 2 External drives to it? I have 8 external drives I want to connect rather than run my PC all day.
Thanks
Hi Kenn, you shouldn’t have any issues connecting a USB 3.0 hub to the ODROID-XU4. I am currently using a Sabrent 7-Port USB 3.0 Hub that I purchased on Amazon. It is self powered, to make sure the drives get enough juice and it has some nice illuminated buttons on it so you can make sure the drives are powered up. I think I was a little ambitious with the 7-port hub however. I have 3x 8TB USB 3.0 drives and an additional 500MB USB 2.0 running on it and my total plot read/process time is about 70 seconds. Depending on your read time goals, it might make sense to have two ODROIDS and a couple of the 4-Port USB 3.0 Hubs instead. If I can get a working NEON miner, or possibly Scavenger running in 32-bit with lower read times, I’ll test out adding more drives to the 7-port.
Great. Thanks Sean. I imagine your read time would be faster without the USB2.0 drive being read. I’ll pick up an Odroid and gradually move the disks across and then make a decision on needing more than one or not.
The USB 2.0 drive is definitely a slug compared to the other three, but it’s only 500MB and adds around 4s read & process time. Total times for the rig range between 72s and 82s.
The ultimate goal for me is to make sure all mining rigs are submitting under 60 seconds.. so I’m still working towards that goal. You can see some testing I did here: Valid Deadlines Last 360 Blocks. This shows blocks that I’ve missed out on from having a read time that’s too slow. The likelihood that I’d actually hit a block on those low round times is still pretty low, so my 60s goal is still a bit arbitrary.
My next steps include either getting a miner to work faster, or adding in a second ODROID-UX4 with another hub and HDs.
I’ve followed your tutorial to the letter and can’t seem to get this to work. Everything appeared to compile fine but when I get to the very end and try to run ‘creepMiner’, I get a command not found error. I’m out of things to try and my research is leading me nowhere. Do you have anything I can try? Thanks.
Hi John, you’ll just need to locate the final location of your executable file. For me, it was in the $HOME/creepMiner/bin folder. It’ll be a file called “creepMiner”. If you navigate to that directory, you should be able to run it by typing “./creepMiner” in the terminal. The command with “./” can only be run in the folder that contains the executable. In order to run it from anywhere, you’ll need to add the $HOME/creepMiner/bin folder to your PATH. To add that, there should be a “.bashrc” file in your home directory (invisible). At the bottom edit the PATH line. Mine looks like “export PATH=$HOME/.local/bin:$HOME/creepMiner/bin:$PATH;”. You could also place the creepMiner executable in your /.local/bin folder and that should work. Once you have your PATH set up, you can just run “creepMiner” from anywhere in the terminal.
Side note: Scavenger is much much faster. I was in the ~70s range with creepMiner and Scavenger reads in ~30s. Check out the article here: Compiling Scavenger From Source to add OpenCL Support. There’s also a pre-compiled version available on GitHub: PoC-Consortium/scavenger. I’m still on version 1.6.4 for mine, but it looks like Johnny has a number of updates since then.